The Mechanics of Starting a Blog (10 Minute Guide to Getting Your Blog Online Right Now)
Alright! Today’s lesson is where the rubber really meets the road. In the next few minutes, you’ll register your domain name and get your blog online (if you haven’t done so already).
In today’s guide, I’ll also walk you step-by-step through installing WordPress as your blog’s content management system (CMS), configuring it with the right free plugins to maximize your search engine optimization (SEO) abilities, and get you on the path to publishing your first blog post ASAP.
1. Registering your domain and setting up hosting.
We’re going to start by heading over to Bluehost and using my 65% off discount to register your domain name and choose the best hosting plan for your needs—personally I recommend the Choice Plus Plan that includes domain protection—to really kick things off.
The setup process is pretty intuitive and easy to follow along with on Bluehost (should take less than 5 minutes), but just in case…
Here’s an in-depth video tutorial I made that’ll walk you through this setup process:
Click here to head over to Bluehost and hit the green “Get Started Now” button.

Choose your plan.
Next, you’ll select a hosting plan. Remember, hosting is the service that actually gets your blog online and keeps it live on the Internet. Personally, I recommend choosing the Choice Plus plan (which I use)—because it comes with Domain Privacy, which will protect your personal information (your full name, email address, phone number and home address) from being published anywhere online.
Instead, Bluehost will guard that information on your behalf. Choosing your plan will look like this right here.
Just click the green “Select” button on your plan of choice:
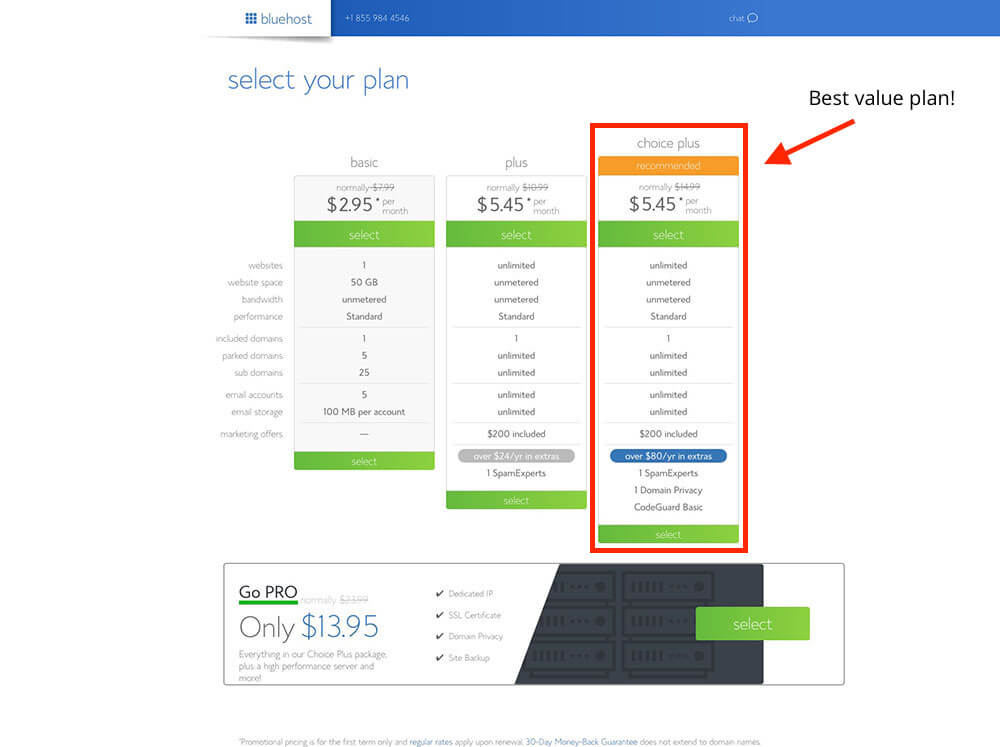
As I said above, I recommend choosing the Choice Plus plan, so that you’re getting the Domain Privacy feature that’ll protect your personal information online, but any of these plans will do as you’re starting your blog—and you can add the domain privacy in later during the checkout process for around $1/mo.
Pick your domain name.
Next, you’ll get to the page where it’s time to choose the domain name for your blog:
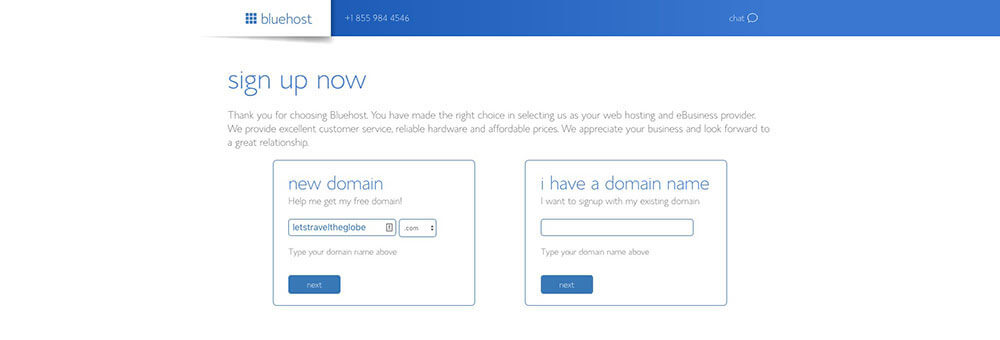
Once you get to this step in the checkout process, just type in the name of the domain name that you’d like your blog to have (mine is ryrob.com). If your domain name of choice isn’t available, you can either try another option that comes to mind—or (what I recommend) select the option to choose your domain name later after getting the rest of your account squared away and taking a little more time to think the name through.
Here’s where you can click to choose your domain later:

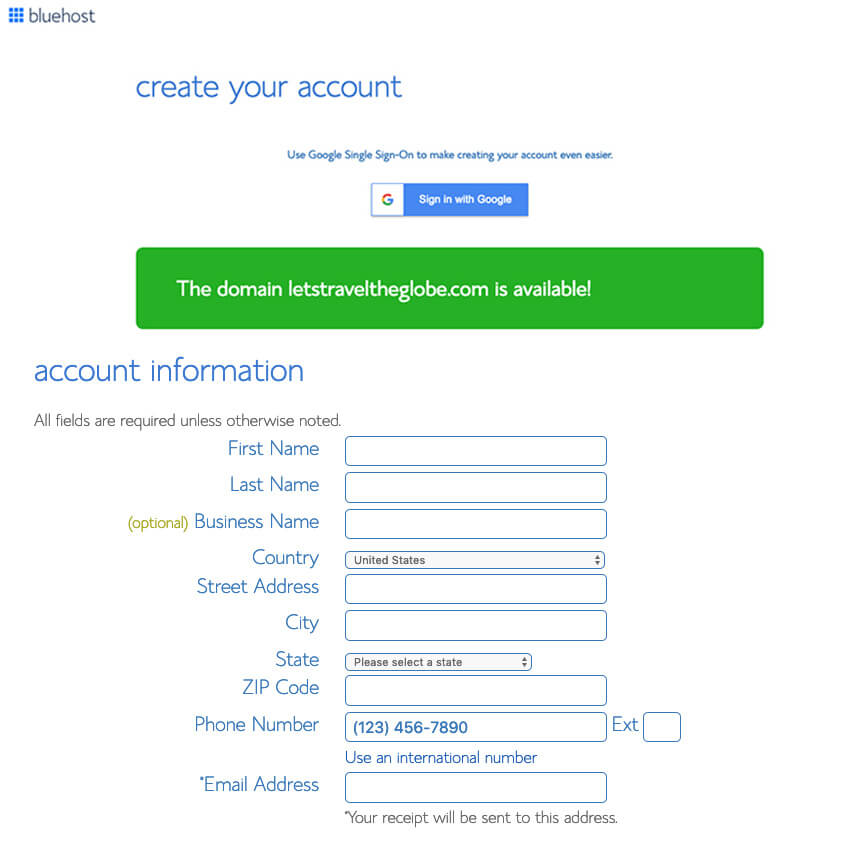
After either choosing your domain name or opting to select it later, you’ll be taken to the final step in the sign up process—creating your account.
Create your Bluehost account.
Start by filling in your account details like your name, email address (it’s super important to use an up-to-date email address because this is where your login details and account information will be sent) and address.
If you don’t want to enter your information manually, you can connect your Bluehost account with your Google account. Either works!
Select the right hosting package. This is where you’ll choose an account plan based on the price you want to lock in and how far in advance you’ll pay.
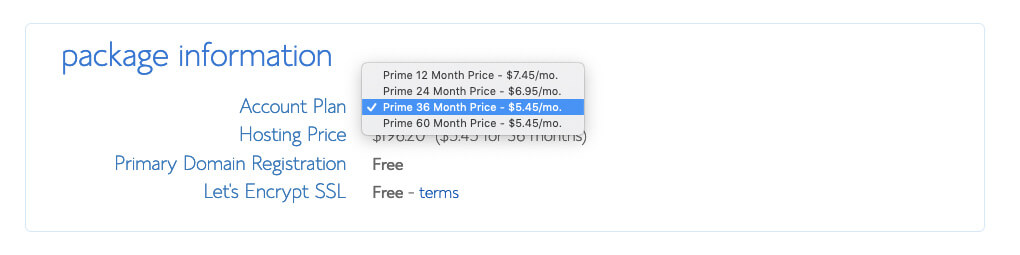
Note that Bluehost only offers options for you to pay 1, 2, 3 or 5 years upfront. They don’t offer a monthly payment option (because hosting companies that do offer monthly payments charge a lot more). Even still, with whichever plan you choose, the price works out to be a great deal for starting your own blog and getting it online today.
Which pricing plan is best?
Personally, I recommend choosing the “Prime 36 Month Price” if you want to lock in the lowest possible price for your hosting. That’s what I use. And it secures your blog hosting at their lowest rate (and gets you domain privacy) for the next 3 years. And because this low pricing for new customers only applies to the first payment you make, if you were to choose the 1-year plan, your pricing may go up after that first year.
That’s why if you choose the 36-month plan, your pricing will be locked in at this low rate for 3 years. For that reason, I recommend going with the longest duration plan that your budget can spring for.
Choosing the right package extras (skip all but one).
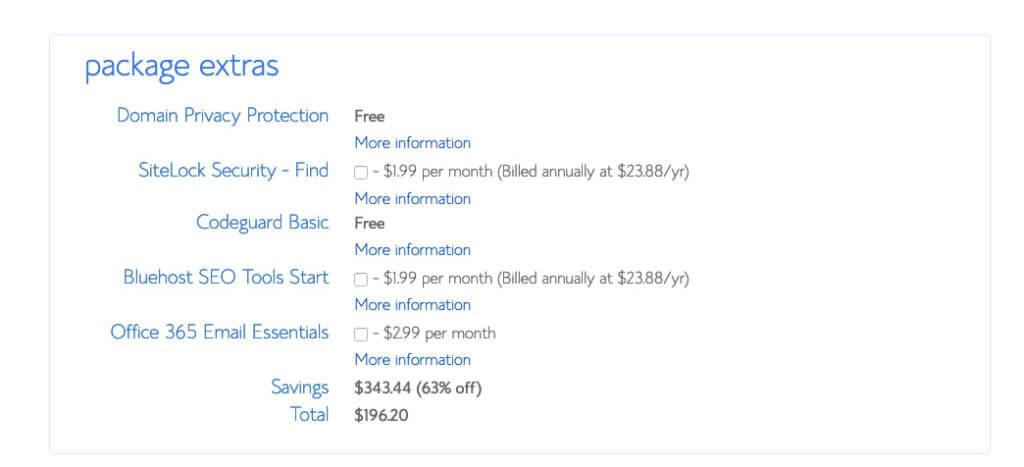
I highly recommend keeping the Domain Privacy Protection extra, but you can get away with skipping the rest. Later on in this course, I’ll show you the many free and cheap plugins & tools you can use for things like SEO optimization, rendering most of these package extras not necessary.
As I mentioned earlier though, having the domain privacy extra keeps all of your personal contact information (your name, email, phone number and address) private. Now, if you chose the Choice Plus Plan on the previous screen, then your Domain Privacy Protection will be listed as “Free” just like this screenshot above shows—it’s included in that plan.
If you chose a Basic or Plus Plan, then you’ll want to check the box to add Domain Privacy Protection to your order for around $1/mo. The total you’ll now see is the amount you’re going to pay today. Remember though, you won’t have to pay again for 1, 2, 3 or 5 years depending on the package you chose. Plus, there’s a 30-day money back guarantee in case things don’t go as planned with your blog.
Enter your billing information.
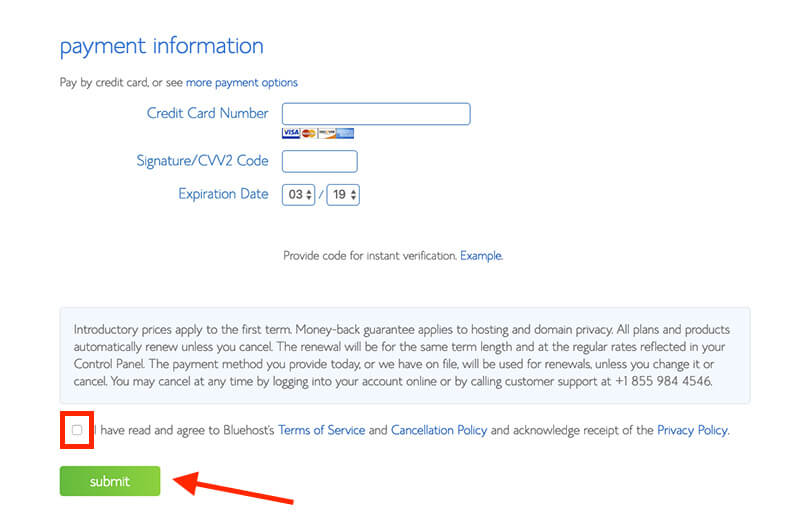
Now you’ll input your billing information, check the box that you agree to Bluehost’s Terms of Service and then hit the green “Submit” button!
Woo! It’s time for a mini celebration 🙂
You’ve officially completed the first major step of how to start a blog. With the initial signup process complete, it’s time to move into the next stage of getting your blog fully setup and optimized.
Once you’ve registered your domain through Bluehost, you should receive a welcome email and receipt delivered via email. And you’ll be directed to a page that looks like this where you’ll create your password for your blog:  Next up, we’re walking through setting up the WordPress configuration for your blog and I’ll be showing you how to publish your very first blog post.
Wordpress is the Content Management System (CMS) that sits behind the scenes and serves as the platform for running your website, making changes to the appearance, and publishing blog posts.
2. Configuring your WordPress install and publishing your first blog post.
Here’s a video walkthrough of configuring the right settings for your new WordPress blog (and we also cover publishing your first post).
Naturally, we didn’t cover EVERYTHING about WordPress in just one short video.
But those are the basics you need to be concerned with first.
Spend some more time poking around in the backend of your blog, exploring, testing things out, and you’ll develop a much deeper understanding of how everything is connected and which things you can quickly change about your site’s appearance. This is all about experimentation!
Quick rundown: The basic WordPress settings you want to become familiar with.
There are many different reasons for starting a blog and just as many unique goals you may want to accomplish with your site, but regardless, it pays to have a basic understanding of the broader aspects of your CMS.
Let’s dig into a few of the bigger picture settings.
1. Permalinks
I touched on this in the walkthrough video above when I customized the URL for the first blog post I published. And when you set up your WordPress blog using Bluehost, the permalink settings will already default optimized to publish new blog posts in the format of domain.com/post-name (like you saw in the video).
If your permalink settings aren’t already set to this format, it’s important to change them right now. This’ll help you rank better in search engines like Google, because your title’s text will appear in each of your URLs.
Go to Settings > Permalinks to make this adjustment.
You can learn more about permalinks in my guide here: What is a Permalink? How to Make SEO-Friendly Permalinks.
2. Your blog’s theme
Like I said in the video above, I don’t recommend buying a paid WordPress theme like the one I use called OptimizePress, until you have some traffic and are generating at least a little income form your site. While OptimizePress is an incredible theme, diving into something like that at this stage will be a distraction from your most important priorities.
WordPress comes with a ton of free themes to choose from, so start with any of the options you see in Appearance > Themes, without wasting much time on this for now. You can always come back and change it later.
3. Your default site URL
Next, you want to change the default URL of your website to include a “www” before your site URL. So you’ll go from https://sideprojectideas.com to https://www.sideprojectideas.com. You can change this quickly by going to Settings > General and following this format:
All of the pages on your blog will now be redirected automatically to the www version, which looks much cleaner and trustworthy.
4. Setting your homepage
As I recommended in the walkthrough video, my advice is to just set your homepage to be where your blog posts display. You have the option of setting your homepage to be a static, custom designed page that can serve to capture email sign ups, sell a product, or otherwise in the future. But for now, stick with just a list of your recent blog posts.
If you’re setting your home page to be the blog, then one thing you can consider is changing the settings to show the complete text of your blog posts right on the homepage, rather than a list that has short previews of each post.
Since you won’t have many posts on your blog for the next few days or weeks, this’ll make it look like there’s more content in the short-term, and you can change the settings back to a list and preview format once you’ve gotten your first 5 or so posts published.
To change this setting, just go to Settings > Reading.
5. Your blog menu
For right now, you won’t need a menu until you’ve published your key pages (About, Contact, Hire, Shop, etc), but when you’re ready to create a homepage or footer menu, just go to Appearance > Menus and you can create them in just a few clicks.
Now, let’s talk plugins…
As I mentioned in our very first video of this series, we’re going to install a few crucial plugins that’ll help get your site up to the standards major search engines like Google want to see.
3. Installing the top (free) essential WordPress plugins on your blog.
These plugins are just the basics I recommend setting up before popping back in to explore, test and experiment in the backend of your blog—and ultimately you’ll learn about and want to install new plugins that seem well-suited to the type of blog you want to create.
Here are the links to where you can download all of the plugin files I mentioned in the walkthrough video, plus a few more you may want to consider installing:
1. Yoast SEO. The more people that can find your content, the better your blog will do. Yoast helps you to optimize your blog post titles, descriptions, content length and other elements across your entire blog so that you can be found easier by search engines.
2. MonsterInsights. This is the best Google Analytics plugin for WordPress and comes already installed out-of-the-box with your Bluehost blog, so there’s nothing you need to do here. It’s already live on your site and in the video above, I show you how to connect it to your Google Analytics account (you can sign up for a free Google Analytics account right here) and you’ll get a ton of insights about who’s coming to your site, how long they’re sticking around, and what your most popular blog posts are.
3. W3 Total Cache.Faster websites rank better in Google and give your readers a better experience. W3 Total Cache reduces your file sizes so that your blog loads faster for everyone.
4. Insert Headers and Footers. Sometimes to edit your theme you’ll have to add code snippets to your header or footer (it’s not as scary as it sounds). However, doing it in the code of your theme can cause issues. This plugin lets you add small snippets of code easily.
5. Sumo.Social shares, email captures, and more. Pretty much a no-brainer if you want to build and grow your blog.
Bonus plugins to consider installing:
6. BackupBuddy. Sometimes things go wrong. It’s always smart to have a backup of all your hard work, and this plugin can back your site up at regular intervals.
7. MaxCDN. Speaking of speed, MaxCDN makes images and other static elements of your blog load faster as well.
8. MemberPress. If you want to build a gated community around your blog content, there’s nothing easier than using MemberPress. You can create subscription, restrict content, and set up payment options.
10. Akismet. Once you start getting readers for your blog, this plugin that protects your site from spam comments by automatically detecting potentially spammy comments will be a life-saver. It’s protected my blog from literally tens of thousands of spam comments, saving me a whole lot of time along the way.
That’s it! You’re ready to rock and roll… Now that you’ve registered your domain, installed WordPress, configured your main settings and added all the essential plugins, I’m turning the keys over to you…
Explore, poke around, test things out behind the scenes of your blog.
Spend some time seeing how a change in the backend affects the appearance of your blog.
Never again will you have the luxury of being able to test major layout changes, new plugins or themes without showing some of your readers radically different experiences—or without having some down time on your site while you make changes.
And if you decide you want to experiment with different WordPress themes for your blog (which I’d place a relatively low priority on today), here’s my criteria for evaluating alternative blog themes.
If you haven’t already, then go ahead and register your domain so you can get your blog online right now.
Pause right here until your blog is online. It’s ok, we’ll wait 😊
Next, I’ve got a couple of bonuses for you.
The first section here is about the qualities and characteristics you should look for in the WordPress theme you choose to use for your blog, plus links to a few resource guides that break down the best themes out there today.
Second, to give you a little preview of what we’ll be covering in the lesson of this course about how to monetize your blog… I’ve got a breakdown of some of the biggest benefits I’ve experienced as a result of starting my blog.
BONUS #1: How to choose an alternative WordPress theme (and my top theme)
Picking a new blog theme can be a lot of fun. But, as I’ve said countless times here today… it can also take up a ton of time that you could otherwise be using to write and promote your posts (and thus getting to your first blog readers and income faster).
It’s also very easy to get swept away by themes that look awesome, but might not be so great functionally.
Here’s exactly what to look for when checking out new blog themes:
- Keep it simple: At the end of the day, the goal of starting a blog is to share content that can be easily consumed (read, watched, experienced). And unfortunately, a lot of fancy blog themes get in the way of that. Don’t get too drawn in by crazy looking themes that compromise on legibility and usability. If a theme looks good, but doesn’t help you share your thoughts and engage with readers, it’s not a good theme.
- Responsiveness is a must: Responsiveness refers to themes that make sure your blog looks as good on a laptop, as it does on someone’s smartphone. Today, more and more people use their phones to read blogs and depending on your audience, that number could be 50% or higher (like mine is). Google also favors mobile-friendly websites and ranks them at the top of their organic search results. If you’re not totally sure whether a theme is mobile friendly or not, copy and paste the URL of the theme’s demo page into Google’s Mobile Friendly Test page. (This test will almost always show some warnings. But major red flags to watch out for are text too small or content wider than screen.)
- Does it work in different browsers? Your readers won’t just be using different devices, but different browsers. Most theme developers rigorously test their themes across browsers, but sometimes mistakes slip through. Try testing on a couple different browsers just to make sure.
- Supported plugins: If you’re using WordPress, the real power of your blog comes from plugins (like the ones you’ve already installed). Make sure the theme you’re choosing supports all popular plugins. If you’re unsure, ask the developer.
- SEO friendliness: SEO, or search engine optimization, refers to how well Google and other search engines can find your information when people search for it. Some themes use bulky code that makes it difficult for search engines to read. And while no one expects you to inspect a theme’s code you should see if the developer has said it is optimized for SEO.
- Support: Problems happen. And when they do, you want to be able to ask for help. Lots of free theme developers won’t offer support for their products. So that’s one thing to be aware of when making your choice.
- Ratings and reviews: Look for themes with a good track record. If the theme is sold on a third-party marketplace you should be able to see reviews no problem. For free WordPress theme, you’ll see the ratings just below the download button.
My favorite blog theme (OptimizePress)
If you’re looking to set up landing pages, a blog, and a membership site, my favorite blog theme (and the one that I’ve been using for years here) is OptimizePress. One of the biggest reasons why I love this blog theme so much, is the visual editor—which ensures I never have to write custom code in order to do something on my blog.
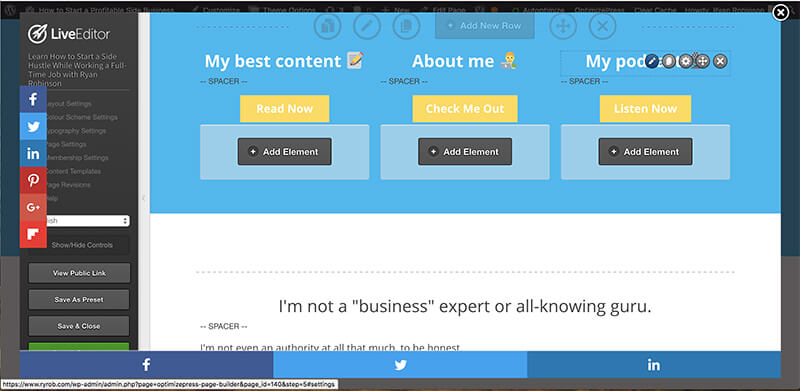
This is important to me for many reasons, most of which being that I don’t have to rely on help from someone else in order to make changes to my blog. Not only does OptimizePress give you a powerful and visually appealing blog template to start with, but it can help you accelerate your progress toward building an online business with things like:
- Templates and themes for landing, marketing, and sales pages
- Mobile-ready versions of every single page you create
- Tons of monetization options like membership portals, courses, and webinars
Price-wise, OptimizePress is definitely on the more premium side of things.
But the functionality, support, flexibility, and ease of use has made it a no-brainer for me—and if you’re here to start a blog with the goal of building an online business for yourself, this is the best route to go.
Over the past few years, I’ve saved hundreds of hours and more than a few headaches by using it. So if you’re looking for a great foundation for a blog that can evolve into an online business (and you have the budget right now), this theme is an awesome option.
Though, OptimizePress is not the only theme out there.
Here are a collection of some of my other favorites: 25+ Best WordPress Themes for New Bloggers to Use
Now remember, let’s not get lost in the weeds here.
BONUS #2: The 5 biggest benefits to starting a blog (today)
#1: Build your marketing skills
The original purpose for building my blog was to experiment, learn and build my marketing skills.
I was interested in a brand new area of marketing called content marketing and was applying for jobs in the field. So, my blog was going to be a testing ground for figuring out how to become a better writer, experiment with different tactics to promote my blog posts (like Facebook Ads, getting content to go viral on Reddit, guest posting) and start attracting readers of my own.
Blogging is hands down the cheapest and most effective way to learn content marketing.
Now that I have this skill, even if my blog were to disappear tomorrow, I could still command six-figure jobs (or freelance gigs) with the expertise I’ve built over the years.
And it all started with my decision to launch a blog… and learn through doing.
For years, my blog was only a place to sharpen my skills. Little did I know it would become my primary source of income.
#2: Help, meet and entertain others
My blog’s allowed me to meet and help thousands of incredible people from all over the world.
From one of my earliest posts breaking down the disastrous failure of my first business (around a product I built in college), I’ve been able to help thousands of readers and course students avoid some of the most painful mistakes along the path to growing a successful business.
Similarly, you can help countless people through your blog.
It’s as easy as starting with your skills (and interests) then teaching them to others. Surely you have 2 or 3 of these in your wheelhouse…
- Writing
- Graphic design
- Web development
- Video or audio editing
- Marketing
- Sales
- Accounting or tax prep
- Admin work
- Tutoring
- Language coaching
- Social media
- Traveling tips and tricks
- Photography
- Interior design or architecture
- Dating and relationships
- Food or restaurants
- Brewing coffee or beer
- Building products
- Data analysis or other technical expertise
The list goes on and on… If you have a skill or interest area that you want to educate others about, a blog is the perfect destination to execute on that—and to eventually monetize.
(Don’t worry, our next lesson is all about picking a well-defined niche that YOU should start a blog about)
#3: Land a better job
In early 2014, I was living at home with my parents. I wanted to move to San Francisco, but needed a job there in order to make it happen.
I started applying to startups, directly emailing the founders and including the link to my new blog in my emails… with the goal of showing them I knew what I was talking about when it came to online marketing (one of the early topics on my blog).
Having a blog where I regularly published about my side projects, marketing experiments, thoughts and interesting findings became a small but meaningful factor that differentiated me from hundreds of other applicants out there. And (my still friend) Matthew at Popexpert took a chance on me.

#4: Get high-paying freelance clients
A little over a year into running my blog, it had already helped me land 2 full-time jobs and my first $500/mo freelance client.
Having a blog gives you a public space to demonstrate your skills and expertise. Because I was getting better at crafting engaging, long-form content on my blog, over time it started to attract people at companies who wanted to publish similar content to their blogs.
Kristen, who ran content for a big eCommerce website (Selz) commented on one of my blog posts about time management shortly after I published it.

After seeing that comment, I sent her an email and started a dialogue that led to Selz becoming my first paying freelance client.
#5: Creating sustainable side income (and eventually a full-time business)
Since starting my blog, it’s helped me unlock numerous new sources of side income…
- Sponsored content on my blog. As my readership has grown, I’ve been able to charge brands like Skillshare, Slidebean and others $1,500/ea for me to write up a sponsored post (and email) for my blog. They pay me to do what I love, write.
- Selling my content marketing services. I regularly book new freelance clients (like LinkedIn, Zendesk, Adobe) for $5,000/mo or more where I’m brought on to advise and execute on creating content marketing campaigns for the brands.
- Online courses. I made over $20,000 alone on the last course about validating business ideas when I launched it to my blog readers.
- Podcast sponsorships. In 2017, launching a podcast gave me an excuse to begin interviewing some of my biggest heroes in the world of startups and business. Now that I have a show, I regularly sell sponsorship slots to brands like Freshbooks at $500/episode to reach my audience.
- Business partnerships. Because of my blog, I’ve been able to meet some incredibly talented entrepreneurs. We’ve collaborated together on projects ranging from content marketing agencies, to launching new niche websites, and building online tools.
Those are just the main sources of side income my blog provides for me, and it’s possible to do a whole lot more.
There are multiple ways you can make money from a blog (and build the right skills).
It may take you 1, 3, 6 or even 12 months to start earning a meaningful amount of income.
But, the more you learn… the more you earn.
The next lesson will be coming your way tomorrow—or if you’re ready to jump straight into it right now… then head back to the email for this lesson and click on the acceleration link at the bottom of the email.