
How fast your website loads is a huge part of a user’s experience on your blog. That’s why having a fast website is essential to success if you’re going to start a blog in the first place. Enter: this Google PageSpeed optimization guide from my friend and talented developer, Andy Feliciotti.
Google also ranks websites based on their speed using their PageSpeed score. It’s no easy task to get your website a perfect 100 score on Google’s PageSpeed test. But I’m here to help! No matter if you have a blog or eCommerce site we’ll go over step-by-step how to get your Google PageSpeed score to 100 in this speed optimization guide.
Google PageSpeed Optimization: How to Score 100 in PageSpeed Insights
- What is Google PageSpeed?
- Why Does Google PageSpeed Matter?
- How to Test Your Website Speed
- Google PageSpeed Best Practices
- Google PageSpeed Optimization & Insights FAQs
Disclosure: Please note that some of the links below are affiliate links and at no additional cost to you, I’ll earn a commission. Know that I only recommend products and services I’ve personally used and stand behind. When you use one of my affiliate links, the company compensates me, which helps me run this blog and keep my in-depth content free of charge for readers (like you).
Ready to Start Your Blog Today?

Check out my ultimate guide How to Start a Blog (on the Side) that’s been featured on Forbes, Inc and Entrepreneur.
First let’s go over the basics of Google PageSpeed then we’ll dive into speeding up your blog.
What is Google PageSpeed?
Page speed is the amount of time it takes your website’s content to reach a user’s browser.
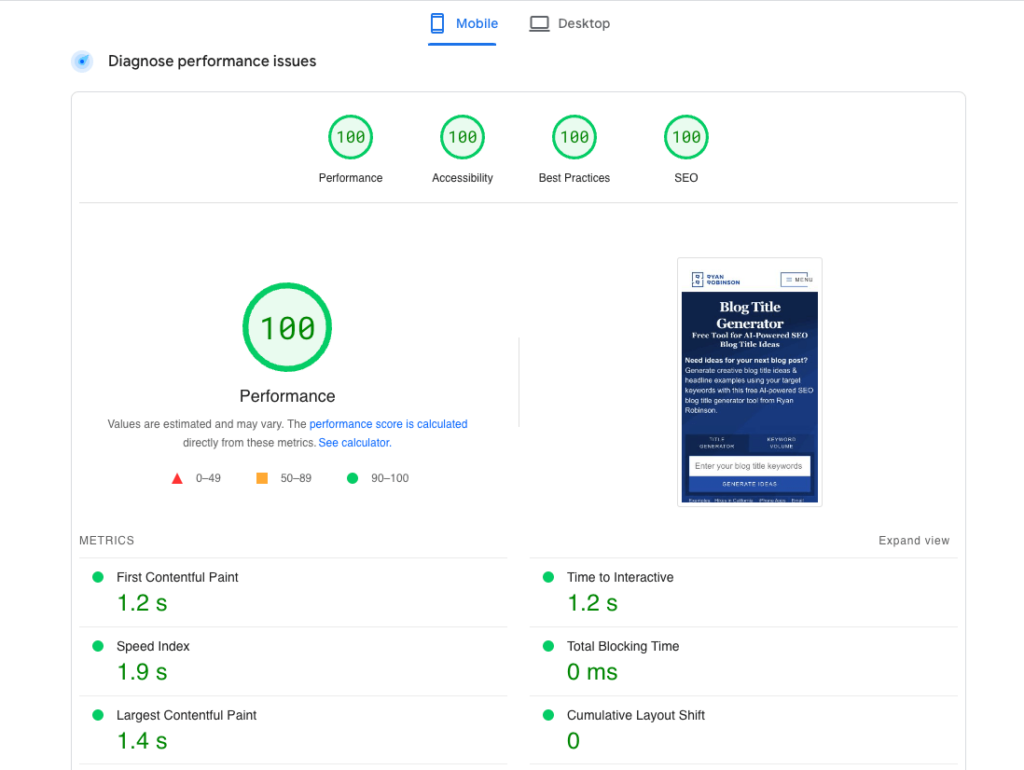
This is so important since users visiting your site don’t want to have to wait for your content. You know the feeling, you find an answer to your question on Google, click a link, and end up giving up when the page never loads. Google knows this too; which is why your site’s speed is a major ranking factor. The most popular tool to test your site’s speed is the Google PageSpeed Insights tool. This is the best way to know exactly what Google thinks of your site in terms of page speed.
Notable Google PageSpeed Metrics:
- Largest Contentful Paint (LCP): Measurement of the perceived page load speed to users. Primarily when above the fold content has finished loading.
- First Input Delay (FID): Measurement in seconds of the delay until a user can interact with the website.
- Cumulative Layout Shift (CLS): Measurement in seconds until the page’s layout has stopped “shifting”. For example an image loading could cause layout shifts on your site. This is important since a user could want to click an element on your site before it’s done loading the a shift may cause them to click something else.
- First Contentful Paint (FCP): Measurement of the time when anything is rendered on screen.
- Interaction to Next Paint (INP): Interaction to Next Paint observes the latency of user interactions made with a page. For example if a user clicks an accordion and there is an unexpected delay when it opens.
- Time to First Byte (TTFB): Measurement of the time until the browser receives a response from the server.
You’ll see these terms used often in Google Search Console (Core Web Vitals report), PageSpeed Insights, and Chrome User Experience Report.
Why Does Page Speed Matter?
Page speed is important because it directly will affect how much traffic and how much money your blog can make.
Studies have shown that site speed directly affects conversion rate. The data from Portent shows that having a 1 second page load speed vs 5 seconds will nearly have a 50% drop in conversions. Not only will your site’s load time affect your Google ranking but it’ll also affect your conversion rate.

From your position in Google search results to customer’s patience your site’s page load time affects every aspect of a user’s experience. Since users are primarily on mobile devices every kilobyte your site loads should be intentional.
The longer a user has to sit and wait for a page to load the higher your bounce rate will be as well. Your site’s speed doesn’t just affect Google’s SERPs but most search engines factor in page speed. This is why having a site that loads fast is essential in today’s web.
Luckily it isn’t too hard to make a fast site if you’re using modern tools and know what to do.
How to Test Your Website Speed
If you aren’t familiar with Google PageSpeed it’s a series of tests that Google runs on your site to determine how fast your site loads. When a user on Google clicks a search result they expect it to load fast. This is why Google created the Google PageSpeed Insights test.
This gives website owners the tools to know exactly what is slowing down their website and how to fix it. Plus it gives Google the data to correctly rank a website in their search engine algorithm.
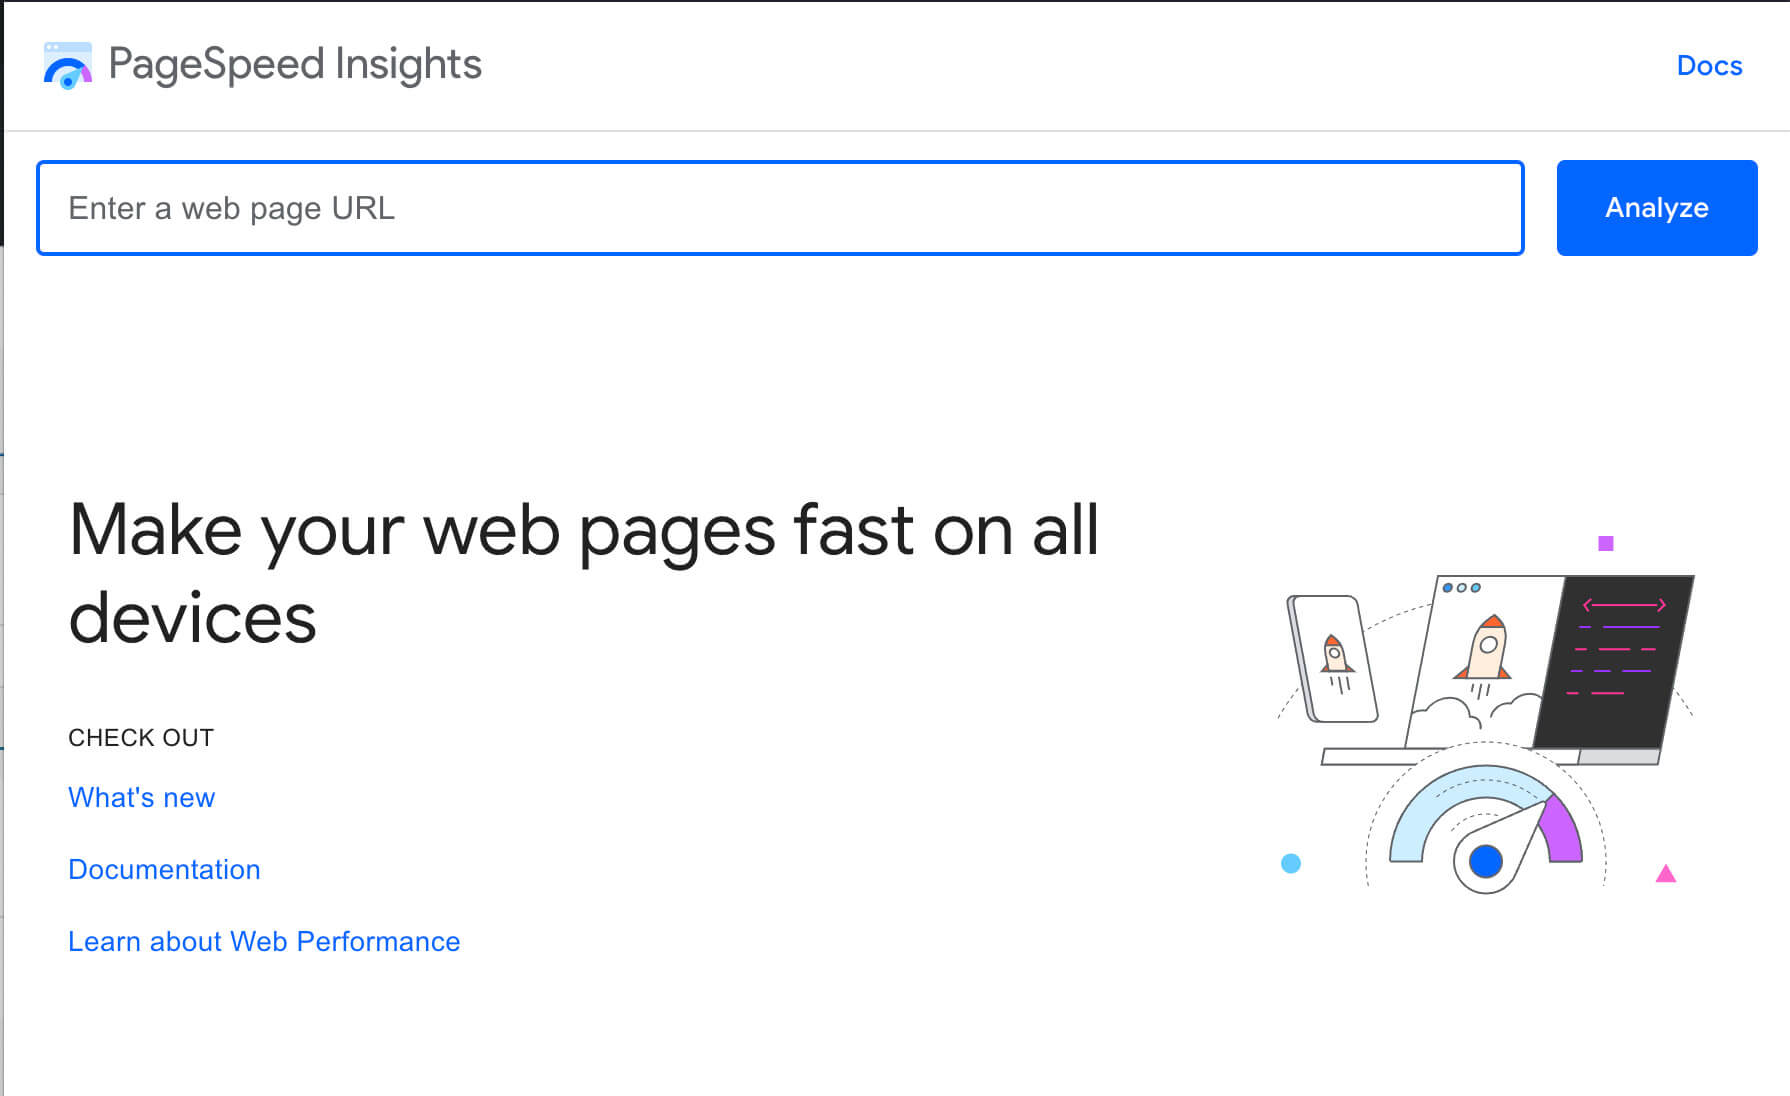
Using the tool is as easy as entering your website’s URL and clicking analyze. The test will run quickly and you’ll be given plenty of key metrics. Additionally if you want to run a local test you can use Google’s open-source Lighthouse to produce similar results right in your browser.
Another place to see website performance is to use Google Analytics page timings report.
Likely you won’t need to fix everything listen in this article but I’ll be going over the most common PageSpeed issues and how to fix them.
PageSpeed Best Practices: Common Google PageSpeed Issues and How to Fix Them
Much of the advice in this section will assume you have a WordPress blog. I’ve also included more detailed instructions for developers to fix issues manually.
By far the best way I’ve found to improve your WordPress site loading speed is to use WP-Rocket. WP-Rocket is a paid plugin but well worth it since it does many of the best performance practices right out of the box. To fix most page speed issues I’ll highlight if WP-Rocket can help and give a free alternative if available.
Your WordPress theme will also play a huge part in core web vitals.
Speed Up Server Response Time
Fast server response time is essential to a great Google PageSpeed score. Basically your server response time is how long it takes for your website’s server to generate the webpage for the user. This is one of the easiest things to fix if you are seeing the warning on your PageSpeed report. The most common way to eliminate this issue is to use page caching. This means your site will serve the web page from cache so the server itself has to do little to no work.
- Enable Page Caching: When a user requests a page from your site it has to be rendered and served. This process can be completely skipped with page caching. Basically when a user visits a page on your site it’ll be saved for the next user in cache so it can be instantly returned. Many WordPress hosting companies have built in page caching but if you are seeing a high server response time it’s likely not enabled. The best WordPress page caching solutions include WP-Rocket, W3 Total Cache, and Cache Enabler. Another popular option for page caching is to use CloudFlare’s Automatic Platform Optimization for WordPress. This uses CloudFlare’s
- Use a Modern Stack: The version of PHP and MySQL your web host uses play a huge part in page speed. High quality web hosting companies should have you covered on this one. If you’re a developer this means keeping up to date with the latest version of PHP and Database solutions.
Enable Compression
Your site can compress its content and page size before sending it to the user’s browser with Brotli (newer, supported by Chrome) or GZIP compression. These compression methods have no affect on your site’s display since user’s browsers automatically handle the compressed content.
Most popular WordPress hosting companies will automatically apply compression for you. If you want to confirm that a compression method is enabled on your site you can use an online GZIP compression test.
Popular performance WordPress plugins will automatically GZIP compress for you including WP-Rocket, WP Super Cache (must be enabled in settings) and W3 Total Cache (must be enabled in settings). WP-Rocket will automatically apply GZIP compression on your site if you’re using Apache without anyone configuration.
For Developers: To enable Brotli or GZIP compression your server you’ll need to know if you’re using Apache or Nginx. Here is a guide to enabling Brotli on Apache and a guide to enabling Brotli on Nginx. Instead of dealing with server configuration I’d recommend opting in to use CloudFlare. For free CloudFlare will apply GZIP and Brotli compression depending on what the user’s browser supports and what content is served automatically.
Minify CSS, HTML and JavaScript
HTML, CSS, and JavaScript all affect your page load speed. While writing code most developers will include tabs, spaces, and other non-essential code to make it human readable. All of these unused characters add up and can slightly slow down your site.
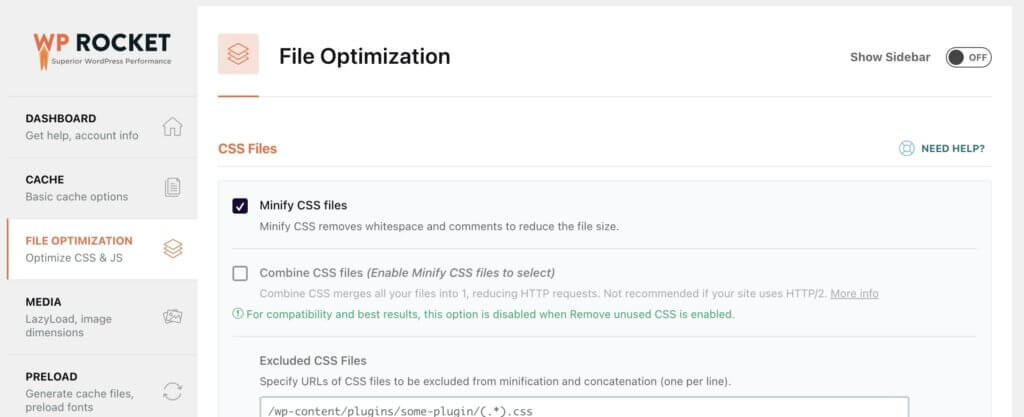
Luckily all of these assets can easily be minified without affecting the user’s experience. WP-Rocket offers a file optimization page with minification options for CSS and JavaScript. Additionally if page caching is enabled in WP-Rocket HTML minification will be applied to pages. A free options is to use the Autoptimize plugin to minify CSS/JS/HTML.
Keep in mind that when you minify JavaScript it may cause issues with functionality so be sure to test when enabling.
For Developers: There are plenty of developer tools that allows devs to compress their files during their workflow. Node.js packages like Clean CSS can be added to a workflow to compress minify files while working on them. Additionally for smaller projects there are plenty of online tool that will compress CSS, JS, and even HTML. If you’re using WordPress you’ll likely want to just opt-in to use a plugin since they’ll achieve the same results with a lot less effort.
Reduce Unused CSS
Removing unused CSS can be difficult. CSS rules that your page has that aren’t used for the page style are considered unused CSS. Most frameworks, themes, and plugins will leave your site with unused CSS.
For example, your WordPress theme could contain styling for a contact page but it’s unused on all other pages of your site but still exists in the stylesheet.
Luckily if you use WordPress there are a couple of plugins that will automatically reduce unused CSS. WP-Rocket and Perfmatters will do a great job at removing unused CSS from your blog. These plugins will load your pages and ensure that it only has the CSS needed to correctly display your page leaving you with a smaller CSS file.
For Developers: To do this process manually developers can work on dequeuing stylesheets from a WordPress site. This will allow you to manually select CSS you want to be added to your theme’s stylesheet. There are also online tools to find unused CSS on your site but likely aren’t sustainable to use for large sites.
Leverage Browser Caching
When users visit multiple pages on your site they likely will be using the same resources. Often images, CSS, and JavaScript are shared across your entire site. This is where browser caching comes in, you can tell a user’s browser to save assets for later use. Most performance plugins for WordPress will add browser caching rules out-of-the-box.
For Developers: Depending on if you’re using Apache or Ngnix you can add server configuration to tell user’s browsers to cache specific content. Typically these browser caching methods are applied to CSS, JS, and images.
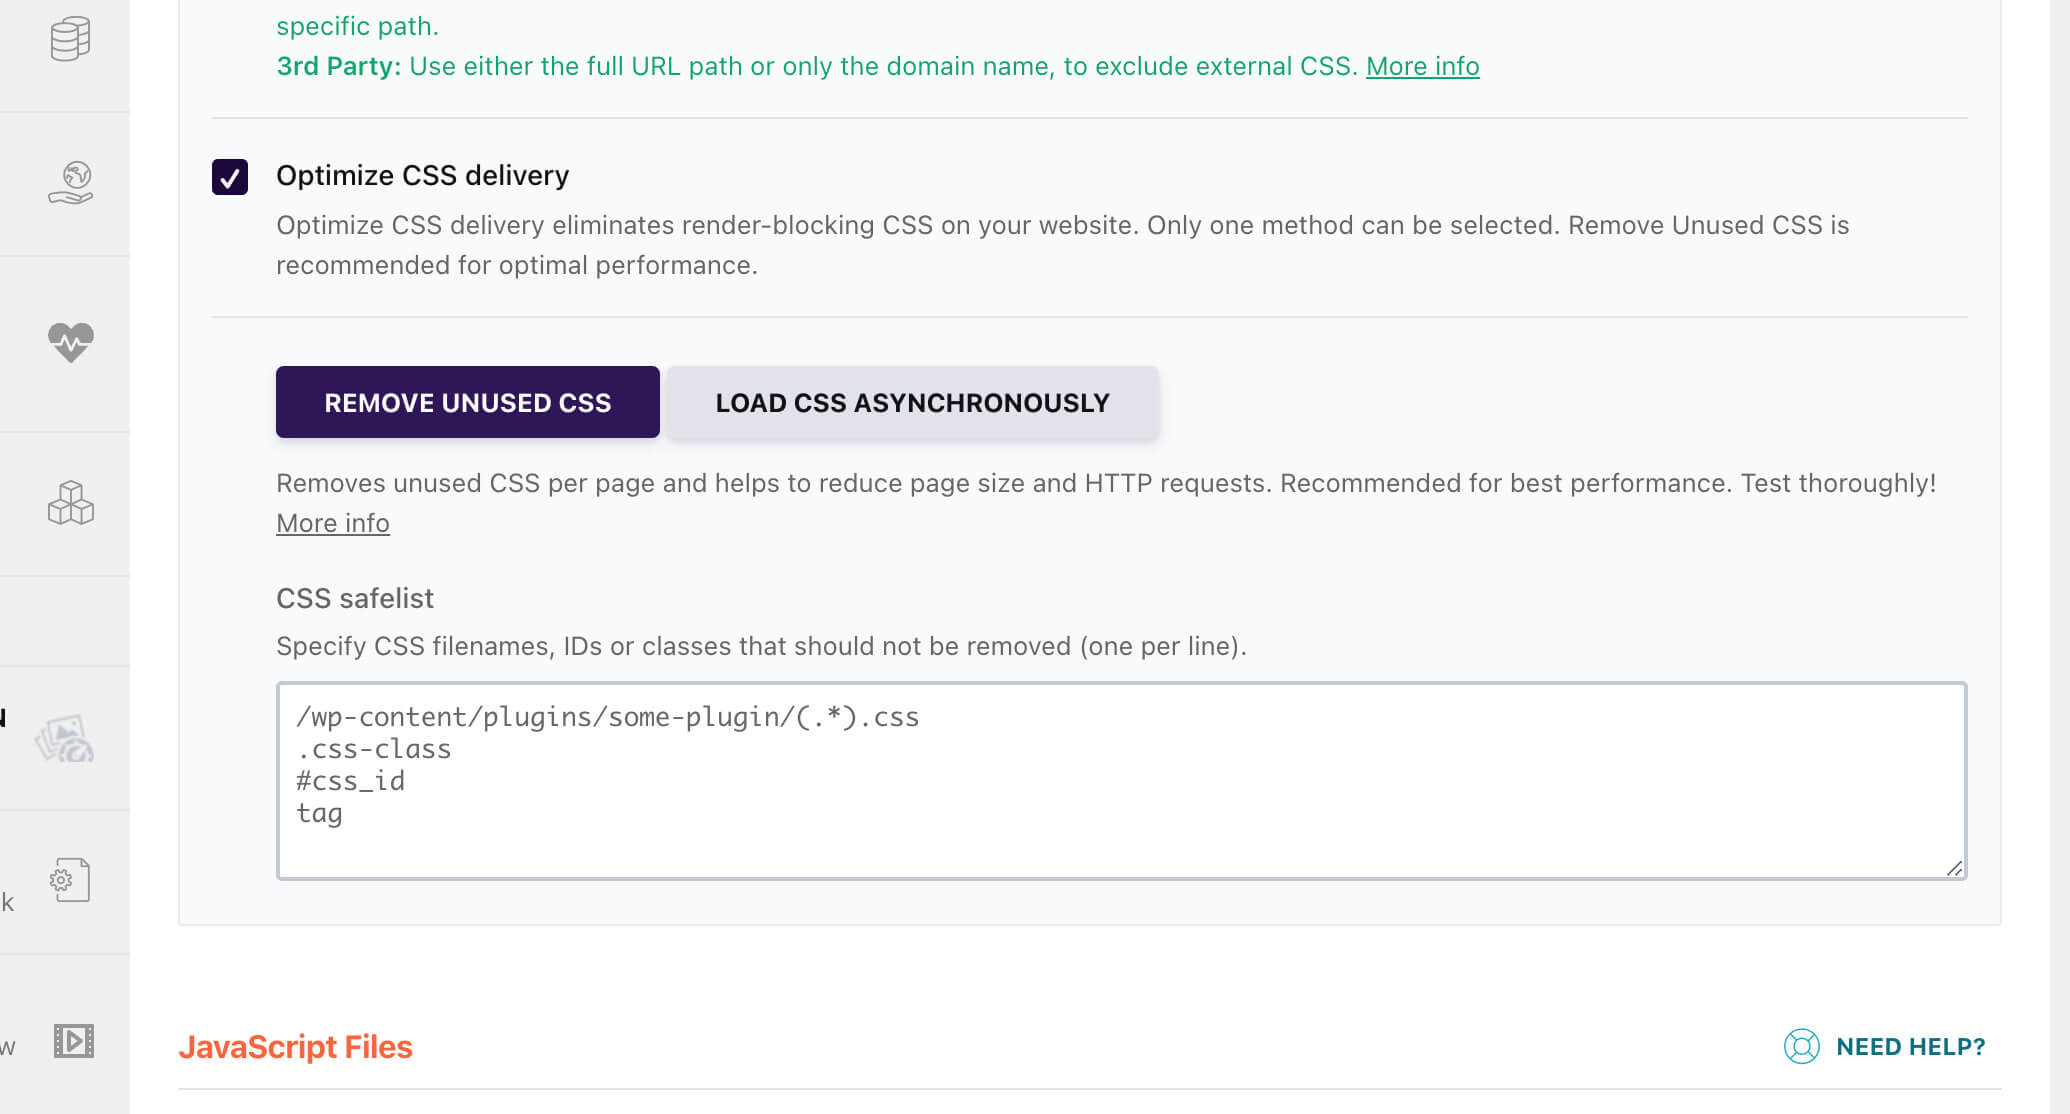
Eliminate Render-Blocking Resources
As a web browser reads your web site’s code it determines what to download and render. JavaScript and CSS files in your <head> tag are considered render-blocking resources. As the browser tries to return the page to a user it has to stop, download the file, and overall will delay the page from rendering.
If your site had render-blocking resources Google PageSpeed Insights will you show you the largest files and potential savings.
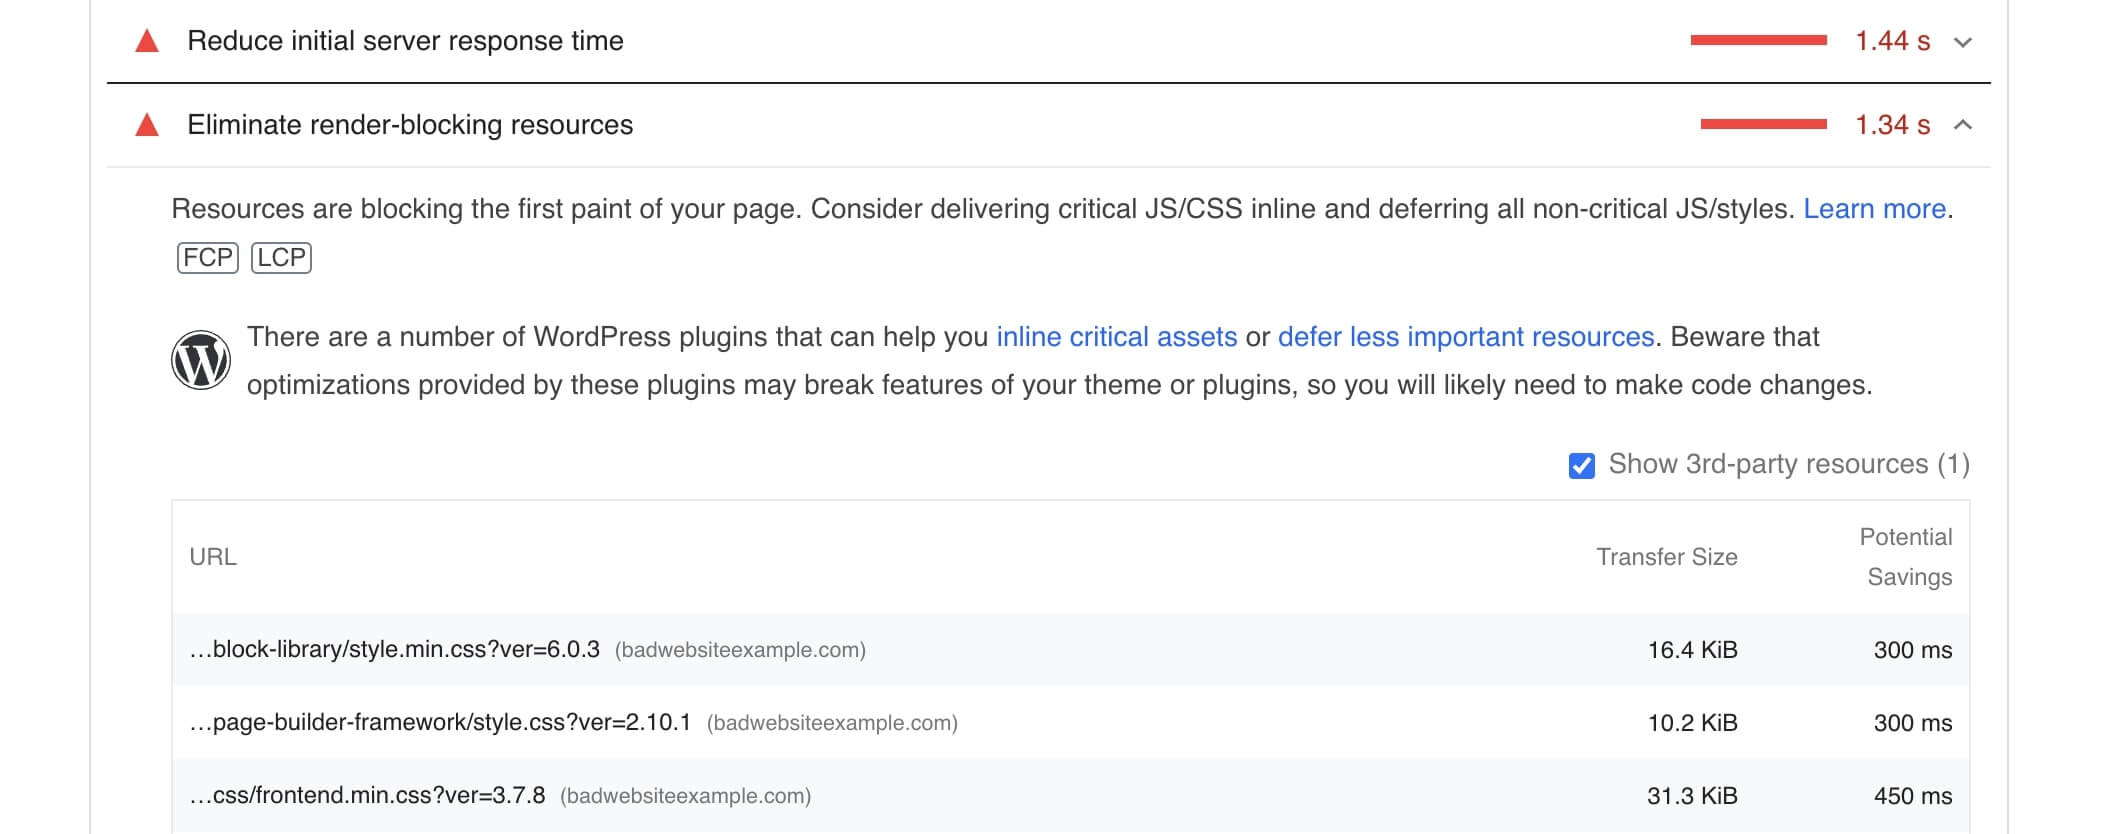
Luckily most performance plugins for WordPress will help you defer or inline JavaScript and CSS. WordPress plugins will also help you move non-essential stylesheets and JS to load at the bottom of your page. WP-Rocket, Autoptimize (free), and Perfmatters all do a job at eliminating render-blocking assets.
For Developers: Developers can take advantage of multiple browser functions to help improve asset loading. This includes using the defer attribute on scripts, moving CSS/JS to the footer, and only including critical CSS in the header. Google’s guide to render-blocking resources.
Efficiently Encode Images
Image compression algorithms have incredible results at compressing images with no perceived loss in quality.
Typically JPG and PNG images can use additional compression when exported. Imagify, ShortPixel, and Smush are all great WordPress plugins for compressing images automatically. Basically these plugins will compress your images as you upload them leading to faster page load speeds. You can also select how much compression is applied to images.
Since it costs processing power to compress images many of these plugins will have a fee for a large amount of images. ShortPixel also offers a plugin to compress images on the cloud using their content delivery network & API. If your site is already using CloudFlare you can sign up for their Pro plan to optimize images on the fly.
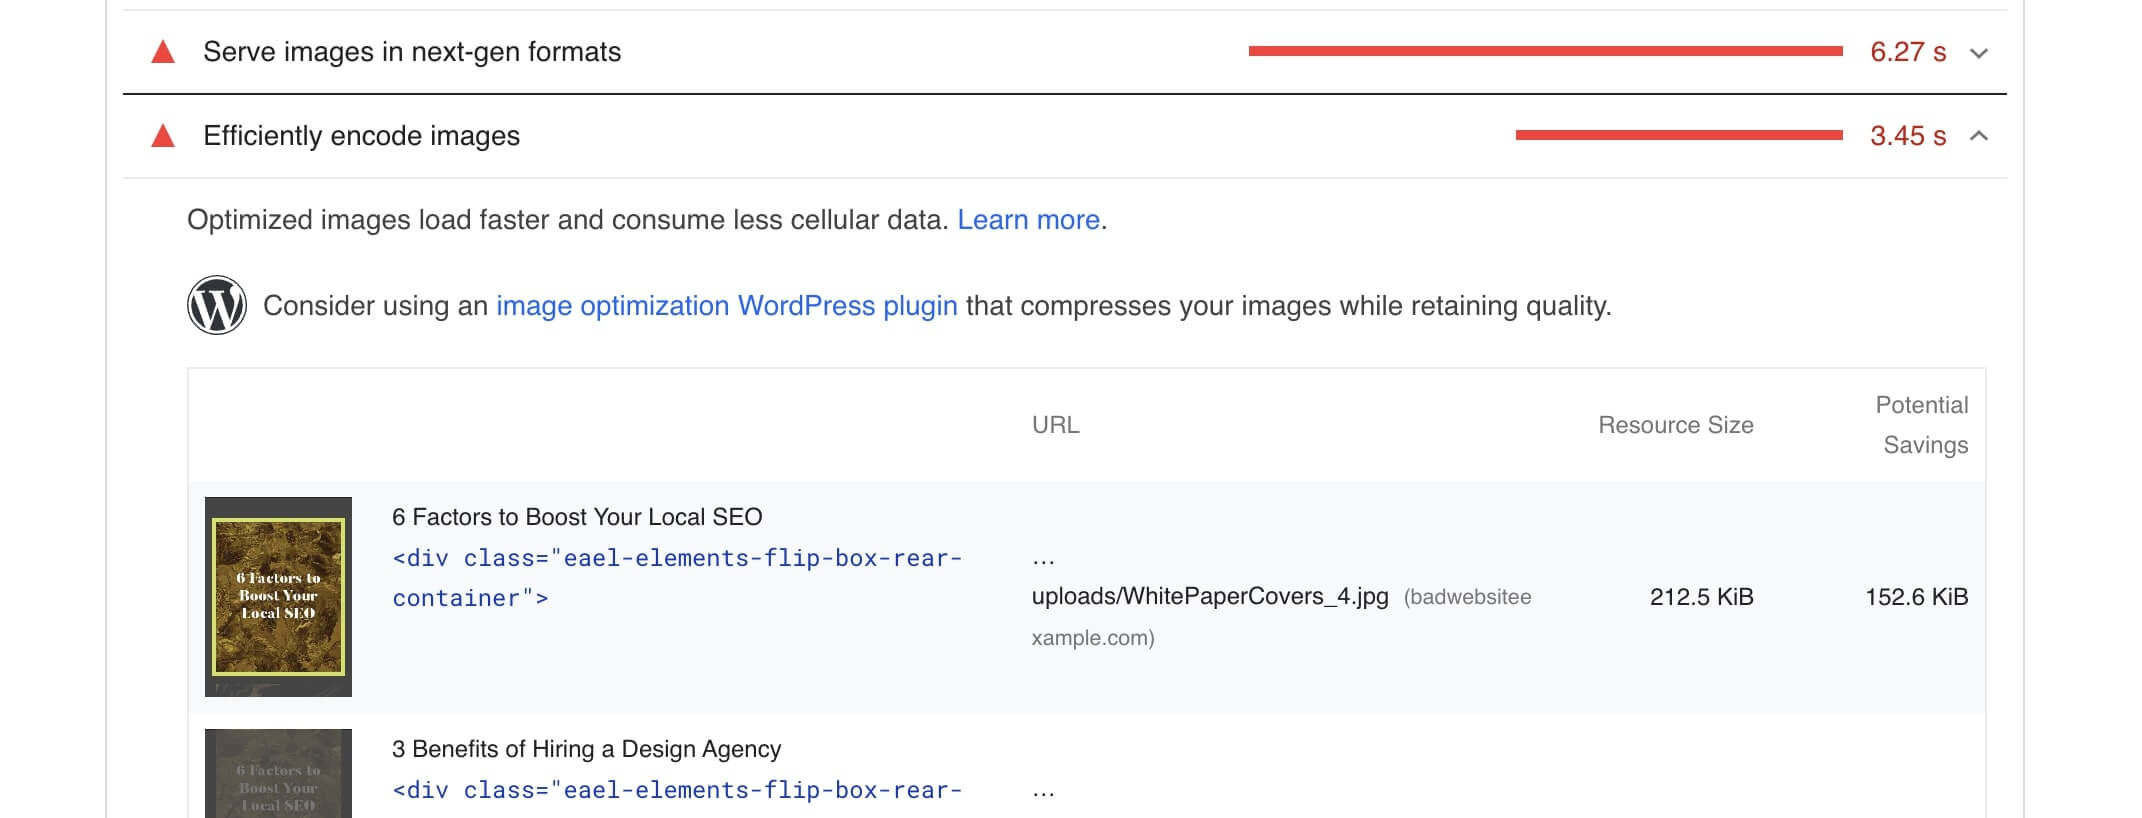
For Developers: There are plenty of tools for image optimization including online tools like Crush Image and desktop apps like imageoptim. Likely you’ll want to compress images at scale so I prefer to use a CDN that automatically compresses images. My personal favorite is the CloudFlare Pro ($20/m) plan that will automatically compress and even server webp images. You can also move to using SVG for graphics like your site’s logo. Also a good rule of note is to use JPEG files for actual photos and SVG/PNG files for graphics. Using a PNG file for a photo will result in an unnecessarily large file.
Properly Size Images
An example of improperly sized images is a large 2000px by 2000px image in a 800px wide div. Since only 800px is visible the browser had to load the larger image for no reason. This leads to a slower page load speed and worse experience for users. Most well designed WordPress themes won’t have this issue.
For Developers: If you’re developing a WordPress theme you can set default WordPress image sizes to correctly match your theme’s width. You’ll need to regenerate WordPress thumbnails after changing image sizes. Keep in mind that if you want to serve images for a retina display you should use the srcset attribute. WordPress also has built-in functions for serving images on a high-pixel density display.
Defer Offscreen Images
When a website is loaded if it contains images all of them will be loaded, even ones below the fold. This is a waste of resources and network usage since the images are viewable. Luckily deferring offscreen images is easier than ever now that all major browser support lazy loading.
By default, WordPress will apply the loading=”lazy” attribute to images to automatically defer offscreen images so you likely won’t see this error. WP-Rocket will also apply lazy loading to images, iFrames, and YouTube embeds. Alternatively you can use the free a3 Lazy Load plugin to apply lazing loading to off-screen elements. If your site has a lot of image files and gifs this is important aspect of improving page load.
For Developers: The easiest way to add lazy loading to an image is to include the loading=”lazy” attribute in the <img> tag. There are also plenty of JavaScript libraries to lazy load content.
All Text Remains Visible During Webfont Loads
When webfonts were introduced it was common practice to hide text before the font loaded. This is a big no-no since users want to instantly start reading your site. WP-Rocket will automatically optimize webfont display when CSS optimizations are enabled. The free WordPress plugin Swap Google Fonts Display will also add the correct parameter to Google Fonts for your WordPress site.
For Developers: Likely you’re using Google Fonts which is quite simple to resolve this finding. All you have to do is add the “&display=swap”query string to your Google Font URL; more details from Google.
Avoid Multiple Page Redirects
If your site has a lot of redirects these will slowly increase page load speed. For example if your homepage / goes to /home.html this will cause a delay in response to your users. You may see this error if you have CSS or JS files that lead to a redirect as well.
Another example is if a URL in your header navigation goes to a URL that redirects. It’s most likely your site won’t be flagged for this if you’re using WordPress.
Google PageSpeed Optimization & Insights FAQs
Here are the most common questions about Google PageSpeed. If there is something missing ask in the comments at the end of this article.
What is the Google PageSpeed Test?
The Google PageSpeed insights test is used to determine the performance of a website. The results of a test gives you a PageSpeed score out of 100.
What is a Google PageSpeed Score?
A Google PageSpeed score is a test run by Google designed to analyze the performance of a Website. 100 is a perfect score while 90 is considered good. While a score between 50 to 90 needs improvement and a score below 50 is poor.
Does Page Speed Affect SEO?
Yes. Google PageSpeed Insights score plays an important factor in SEO. Google uses page speed as a key factor in ranking a website.
How Can I improve My Google PageSpeed Score?
Hopefully this article helped improve your Google PageSpeed score. The basics include removing render-blocking resources, removing unused CSS, optimizing images, and decreasing time to first byte.
Final Thoughts on Google PageSpeed Optimization for Your Blog
I hope these tips to nailing your Google PageSpeed optimization will help improve the performance of your blog & lead to increases in organic traffic over time. As the web evolves and tools get easier to use it’ll be easier and easier to speed up WordPress sites.
There are tons of things you can do to improve a Google PageSpeed score but I’d recommend on getting a passing test.
Having a passing test (score above 90) will play a large part in ranking your content in the top spots for organic Google search results. Don’t forget though, achieving a perfect 100 score can end up being an endless task as web standards change, so strive to remaining in that 90+ range and you’ll be just fine.
Ready to Start Your Blog Today?
Check out my ultimate guide How to Start a Blog (on the Side) that’s been featured on Forbes, Inc and Entrepreneur.
Loved this guide…
Glad it was helpful to you Sanu!
🙏
Nice, my performance was good when i checked mine
Great to hear! sounds like you don’t need the article 😂
Great insights, Andy. Really loved it.
I’ve been using WP Rocket for a while but never optimized it properly. I’ll work on it now.
Thanks for sharing these guidelines.
Just let me know if you have any questions, I think WP-Rocket gets you mostly there. The harder stuff is eliminating wasteful assets since moving away from a theme isn’t an option for all.
Glad it was helpful!
Thanks, this was a helpful content.
I have noticed that my performance changes for some website when I changed theme.
would you recommend any free or paid theme that’s suitable for achieving a 100 score
GeneratePress and KadenceWP are my go-to recommended themes
Thank you Andy ! I will surely do it asap. However my technical skills are limited…
If you have any questions just let me know on twitter! (username: @sup) hopefully I made the guide easy enough for non-technical skills though.
hi ryan. I love your articles so much. could you please help me with a list of free plugins i should have on my website. I really struggle with speed. can one use spark traffic with google Adsense approval? My traffic is really wanting. thax
Of course, Flora! Check out these plugins here: https://www.ryrob.com/best-wordpress-plugins/